Analyzing
How to use Bundle Analyzing to analyzing and visualizing the size and composition of the bundles.
Bundle Analyzer is a tool used for analyzing and visualizing the size and composition of the bundles generated by a web application. It provides insights into the individual modules, their sizes, and their dependencies, helping developers understand the overall bundle size and identify potential optimizations.
The Bundle Analyzer tool offers a visual representation of the bundle through interactive graphs, charts, and tables. It can display information such as module size, file size, and dependency tree. By analyzing the bundle, developers can gain a deeper understanding of which modules contribute the most to the overall bundle size.
Some key benefits of using Bundle Analyzer include:
Identifying large dependencies: It helps in pinpointing large dependencies or modules that might be bloating the bundle size. By identifying these dependencies, developers can explore optimization strategies such as code splitting or lazy loading to reduce bundle size and improve application performance.
Understanding bundle composition: Bundle Analyzer provides insights into the composition of the bundle, highlighting the relationships between modules and how they contribute to the overall size. This information can assist in making informed decisions about refactoring, optimization, or removing unused code.
Visualizing bundle size over time: It allows developers to track changes in bundle size over time, making it easier to identify any sudden increases or regressions. This information can be valuable for monitoring and maintaining application performance.
Optimizing build configuration: By analyzing the bundle, developers can fine-tune build configurations, webpack settings, or module bundler plugins to optimize the bundle size and improve application loading times.
How to Analyze our Vactory Next project
- Add @next/bundle-analyzer to your project:
Usually it’s already pre installed in Vactory Next, if its not, just run: yarn add @next/bundle-analyzer
- Configure next.config.js file:
Add the following to your next.config.js file:
next.config.js
const withBundleAnalyzer = require("@next/bundle-analyzer")({ enabled: process.env.ANALYZE === "true",})- Configure package.json file:
Then in your package.json file, add the following in the scripts object:
package.json
"analyze": "cross-env ANALYZE=true yarn build",- Start Analyzing:
Now that everything is configurated, simply run: yarn workspace YOUR_WORKSPACE analyze
When you run the command above, your report will automatically open. You will receive three reports:
- A report for the
server-side - A report for the
client-side - A report for
middleware
What should I look for in the reports?
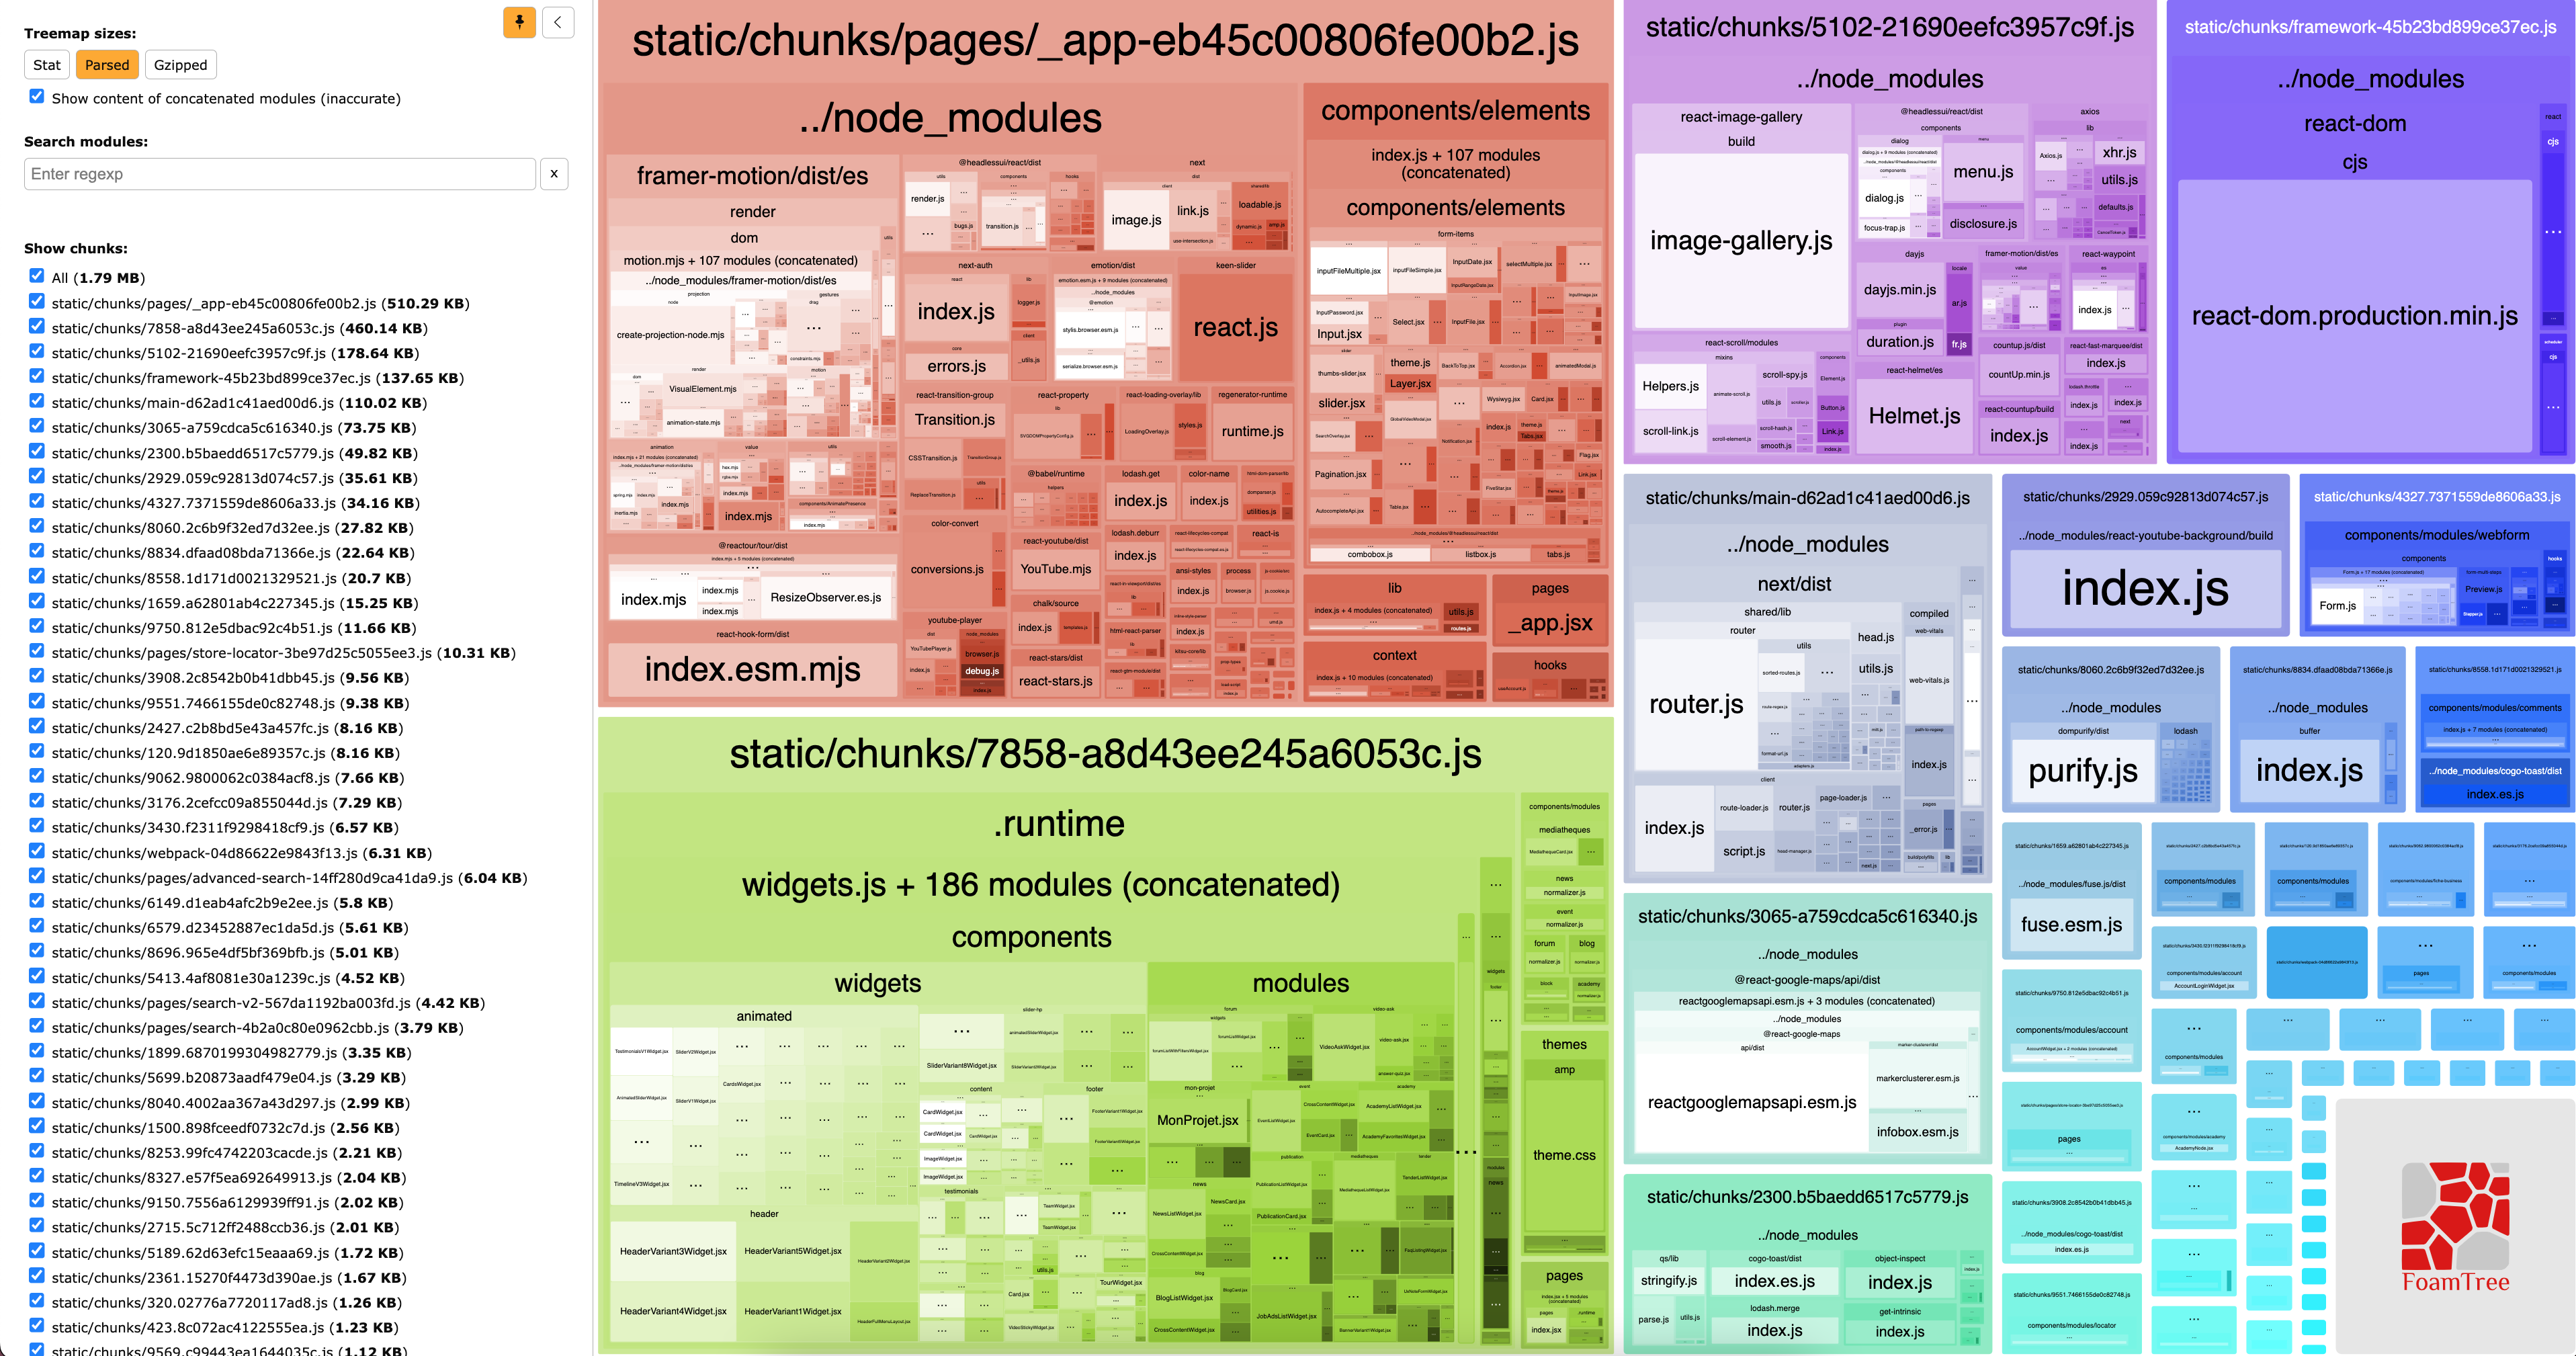
Let’s look at what’s in the report. This is how the client report of Vactory looks like:

The boxes that you see are called chunks, each chunk has a unique color.
What is a chunk anyway?
In Next.js, a chunk refers to a JavaScript file that contains a portion of the application's code. It represents a discrete unit of code that is dynamically loaded when needed.
Next.js uses code splitting techniques to split the application's JavaScript code into smaller chunks. These chunks are generated based on the routes and dynamic imports within the application. Each route or dynamically imported component/module will result in a separate chunk.
The purpose of chunking in Next.js is to optimize the loading and execution of the application. By splitting the code into smaller chunks, Next.js enables lazy loading, where chunks are loaded on-demand as the user navigates through the application. This approach helps reduce the initial load time and improves the overall performance of the application.
Next.js automatically generates unique identifiers for each chunk, typically in the form of hash-based filenames. These identifiers are utilized for caching and versioning, ensuring that the correct versions of the chunks are served to the client.
By leveraging chunks, Next.js allows for efficient code splitting, enabling developers to create scalable and performant web applications. It optimizes the loading process, ensuring that only the necessary code is fetched w
Analyzing chunks
In the generated report, you can examine the different chunks. The report provides visualizations, such as graphs and charts, to display information about the size, dependencies, and composition of each chunk. You can interact with the report to explore the chunks and their relationships, helping you identify areas for optimization and understand the overall structure of your bundle.
What can I do with these in information
Now that you understand the contents of the report and the concept of chunks, let's explore what you can do with this information:
Webpack recommends that a bundle should not exceed 250kb when unminified. If you notice larger bundles, consider utilizing code splitting to break them down and potentially lazy load certain parts. For instance, if you encounter a large-sized library like zxcvbn within the _app chunk, it's advisable to split it into a separate chunk. This approach will create a new chunk specifically for that library, reducing the size of the _app chunk. Moreover, loading these smaller JS files will be faster due to their reduced size.
Check for deprecated libraries. If you're not relying on them, remove them from your project.
Are there any code duplications? Do you notice the same code repeated across multiple bundles? Consider extracting that code into its own bundle to avoid redundancy.
By following these guidelines, you can optimize your bundle size, improve loading times, and enhance the overall performance of your application.
