WebForm
Webforms in Vactory allow you to create interactive forms that can be embedded anywhere in your decoupled application. The webform system provides flexible customization options and seamless integration with your Next.js frontend.
Installation
Step 1: Enable the Module
Install the Vactory Decoupled Webform module:
drush en vactory_decoupled_webformStep 2: Create Webform Widget
Create your custom webform dynamic field widget:
./modules/custom/your_custom_module/widgets/webform/settings.yml
name: 'Simple'multiple: FALSEcategory: 'Formulaires'enabled: TRUEfields: webform: type: webform_decoupled label: 'Formulaire' options: '#required': TRUE '#default_value': webform_id: your_webform_idStep 3: Create Page with Webform
Create a new page and integrate the recently created webform widget.
Frontend Implementation
Visit the page created on the Next.js app.
Basic Widget Setup
Create the basic widget mapping:
./components/widgets/contrib/formulaires/WebformWidgetContainer.jsx
export const config = {    id: "vactory_custom_module:webform",}
export const WebformWidgetContainer = ({ data }) => {    console.log({data})    return <>Webform</>}
Complete Implementation
To display the webform using the widget, follow these steps:
Step 1: Import the Form Component
Import the Form component from the webform module (Vactory Next.js module):
const Form = dynamic(() => import("@/form").then((mod) => mod.Form), { ssr: false, loading: () => <p>Loading...</p>,})Step 2: Extract Webform Data
Retrieve the webform information from the widget data:
const webform_id = get(data, "components.0.webform.id", null)const elements = get(data, "components.0.webform.elements", null)let style = get(data, "components.0.webform.style", {})let buttons = get(data, "components.0.webform.buttons", {})Step 3: Render the Form
Display the webform using the Form component:
<Form webformId={webform_id} schema={elements} styles={style} buttons={buttons} />Complete Widget Example
Here is the complete webform widget implementation:
./components/widgets/contrib/formulaires/WebformWidgetContainer.jsx
import get from "lodash.get"const Form = dynamic(() => import("@/form").then((mod) => mod.Form), {    ssr: false,    loading: () => <p>Loading...</p>,})
export const config = {    id: "vactory_custom_module:webform",}
export const WebformWidgetContainer = ({ data }) => {    const webform_id = get(data, "components.0.webform.id", null)    const elements = get(data, "components.0.webform.elements", null)    let style = get(data, "components.0.webform.style", {})    let buttons = get(data, "components.0.webform.buttons", {})
    if (style !== "") {        style = JSON.parse(style)    }
    if (buttons !== "") {        buttons = JSON.parse(buttons)    }
    return (<>        {elements && (            <Form                 webformId={webform_id}                 schema={elements}                 styles={style}                 buttons={buttons}             />        )}    </>)}
export default WebformWidgetContainer
Customization
Override Webform Schema
The Form component contains a render property that allows developers to customize each field as desired.
Custom Render Example
<Form webformId={webform_id} schema={elements} styles={style} buttons={buttons} render={(resetForm, isLoading, isSuccess, isError) => { return ( <div className="flex flex-col gap-y-[32px]"> <div> <div className="mt-1"> <RenderField field={["name", schema.name]} /> </div> </div> <div> <div className="mt-1"> <RenderField field={["mail", schema.mail]} /> </div> </div> <div className="grid grid-cols-2 gap-x-[32px]"> <Button className="col-start-2 self-end" disabled={isLoading} type="submit" > Send </Button> </div> </div> ) }}></Form>Make sure you have imported the RenderField component:
import { RenderField } from "@/form"Setting Default Values
There are two methods to set default values for webform elements.
Method 1: Drupal Backend Configuration
Visit the build page of your webform on Drupal:
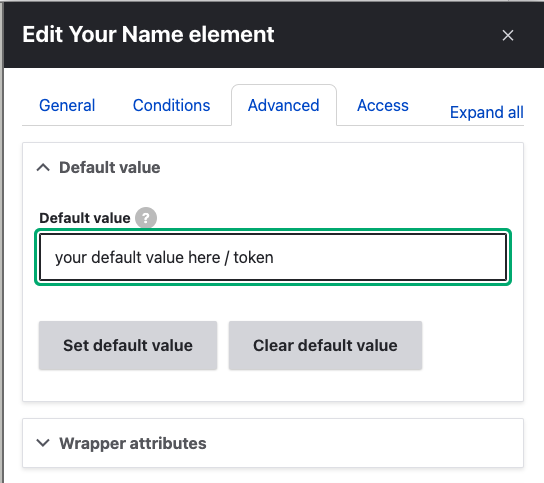
/admin/structure/webform/manage/your_webform_idEdit the settings of each webform element to provide default values.

Set your default value and save changes.
Method 2: Runtime Default Values
The Form component contains a runtimeDefaultValues property that enables developers to define default values for individual fields.
Runtime Default Values Example
runtimeDefaultValues = {    name: 'khalid',    mail: 'k.bouhouch@void.fr'}
return (<>    {elements && (        <Form             webformId={webform_id}             schema={elements}             styles={style}             buttons={buttons}             runtimeDefaultValues={runtimeDefaultValues}        />    )}</>)
Conclusion
You have successfully integrated webforms into your Vactory application! Your forms are now ready to collect user data with full customization capabilities and responsive design.
