Cross Content Decoupled
Cross Content Decoupled allows you to display content from different content types in a unified way, enabling you to create dynamic content collections that span across your entire site. This feature is particularly useful for creating related content sections, featured content blocks, and cross-promotional content areas.
Setup Instructions
Step 1: Enable the Cross Content Module
Enable the following module in your Drupal installation:
drush en vactory_decoupled_cross_contentOr enable it through the admin interface at /admin/modules.
Step 2: Configure Content Type
Navigate to your content type configuration page:
/admin/structure/types/manage/**content_type**
Replace **content_type** with your actual content type machine name (e.g. vactory_news, etc.).
Step 3: Enable Cross Content Feature
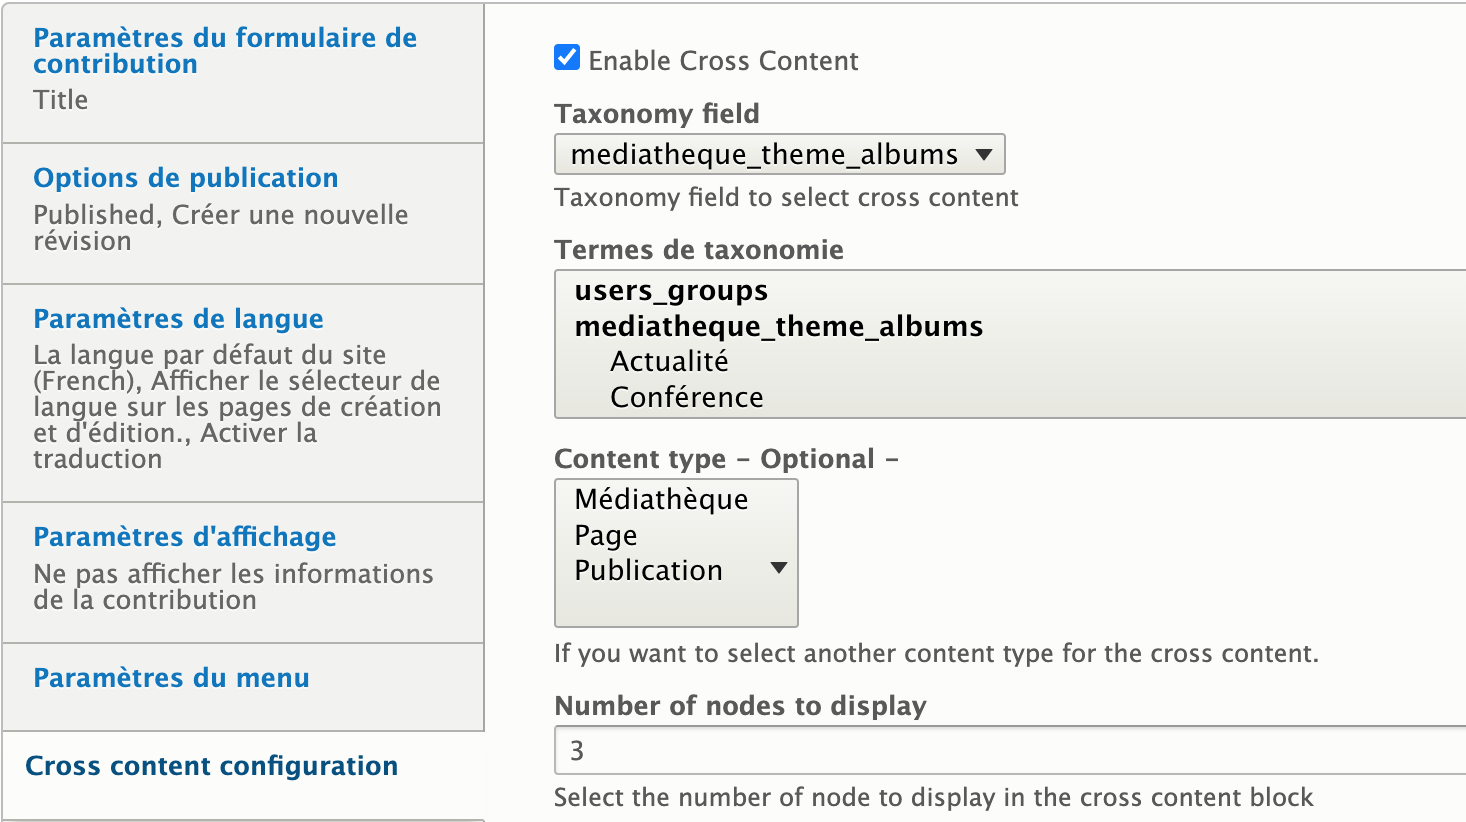
In the content type configuration, enable the cross content functionality:

This setting allows the content type to participate in cross-content relationships and be available for cross-content widgets.
Step 4: Create Custom Widget
Create your custom Dynamic Field (DF) widget that utilizes the json_api_cross_content field type.
Widget Configuration Example
Here's a complete example of a cross-content widget configuration:
./modules/custom/your_custom_module/widgets/cross-content-news/settings.yml
name: 'Cross content news'multiple: FALSEcategory: 'Cross Content'enabled: TRUEfields: title: type: text label: "title" intro: type: text_format label: "Introduction" options: "#format": full_html link: type: url_extended label: "Link" collection: type: json_api_cross_content label: 'JSON:API' options: '#required': TRUE '#default_value': resource: node--vactory_news filters: - fields[node--vactory_news]=drupal_internal__nid,path,title,field_vactory_news_theme,field_vactory_media,field_vactory_excerpt,field_vactory_date,is_flagged,has_flag - fields[taxonomy_term--vactory_news_theme]=tid,name - fields[media--image]=name,thumbnail - fields[file--image]=filename,uri - include=field_vactory_news_theme,field_vactory_media,field_vactory_media.thumbnail - page[offset]=0 - page[limit]=3 - sort[sort-vactory-date][path]=field_vactory_date - sort[sort-vactory-date][direction]=DESC - filter[status][value]=1Step 5: Create Block Instance
Navigate to the block creation page:
/block/add/vactory_block_component
Create a new block using the widget template you just configured. This block will serve as the container for your cross-content display.
Step 6: Configure Block Layout
- Go to the Block Layout administration page (
/admin/structure/block) - Find your newly created cross-content block
- Place it in the desired region (e.g., Footer, Sidebar, Content)
Step 7: Set Block Visibility
Configure the Visibility settings for your block to control where and when it appears:
- Set page-specific visibility rules
- Configure user role restrictions if needed
Frontend Implementation
Step 8: Create Next.js Component Mapping
In your Next.js application, create a mapping file to handle the cross-content widget:
./components/modules/contrib/news/CrossContentWidget.jsx
export const config = {    id: "vactory_news:cross-content-news",}
const CrossContentNews = ({ data }) => {    console.log({data})    return <>News Cross Content</>}
export default CrossContentNews
Data Structure
The data prop will contain the cross-content collection with the same structure as JSON:API collections, allowing you to:
- Access individual content items
- Utilize included relationships
- Handle pagination if configured
- Apply client-side filtering or sorting
Best Practices
- Performance: Use appropriate field selection to minimize data transfer
- Accessibility: Ensure your cross-content displays are accessible
- Responsive Design: Make sure cross-content blocks work well on all devices
Conclusion
Congratulations! You have successfully implemented cross-content functionality in your decoupled Vactory application. Your content can now dynamically display related items from across your site, creating a more engaging and interconnected user experience.
